Mastering REST API Testing with Postman: A Comprehensive Tutorial for Effective API Testing
Table of Contents
1. REST API Testing with Postman
1.1. Why Postman tool?
1.2. Install native Postman Application
2. Getting Started with Postman
2.1. What is HTTP?
2.2. Most common HTTP methods:
2.4. How to Test GET Requests
2.5. How to Test POST Requests
2.6. How to Test PUT, PATCH, DELETE
3. REST API Automation Testing using Postman
3.1. Automate the Login API through Postman
1. REST API Testing with Postman
Reliable API calls are critical to any decoupled application. Whether it is a simple configuration change to an entity or updating the Drupal core, both of them can alter the API response and lead to application-breaking changes on the front end. An API test suite can watch out for these API-breaking changes by running a slew of tests against your endpoint. And when you need to create an API test suite, Postman delivers.
1.1. Why Postman tool?
Postman is a simple GUI for sending HTTP requests and viewing responses. It is built upon an extensive set of power tools, which are incredibly easy to use. Postman helps you perform a variety of functions ranging from
- Organizing requests into collections and folders,
- Sharing common values across requests with environment variables,
- Scripting tests with the built-in node.js-based runtime,
- And at last, automating it all using Postman’s very own CLI — Newman.
1.2. Install native Postman Application
Postman for Mac/Windows/Linux:
Go to https://www.getpostman.com/apps and download the application based on the OS you are using and follow the steps prompted to successfully install the Postman application.
After you have installed Postman successfully, your Postman window should look like this:
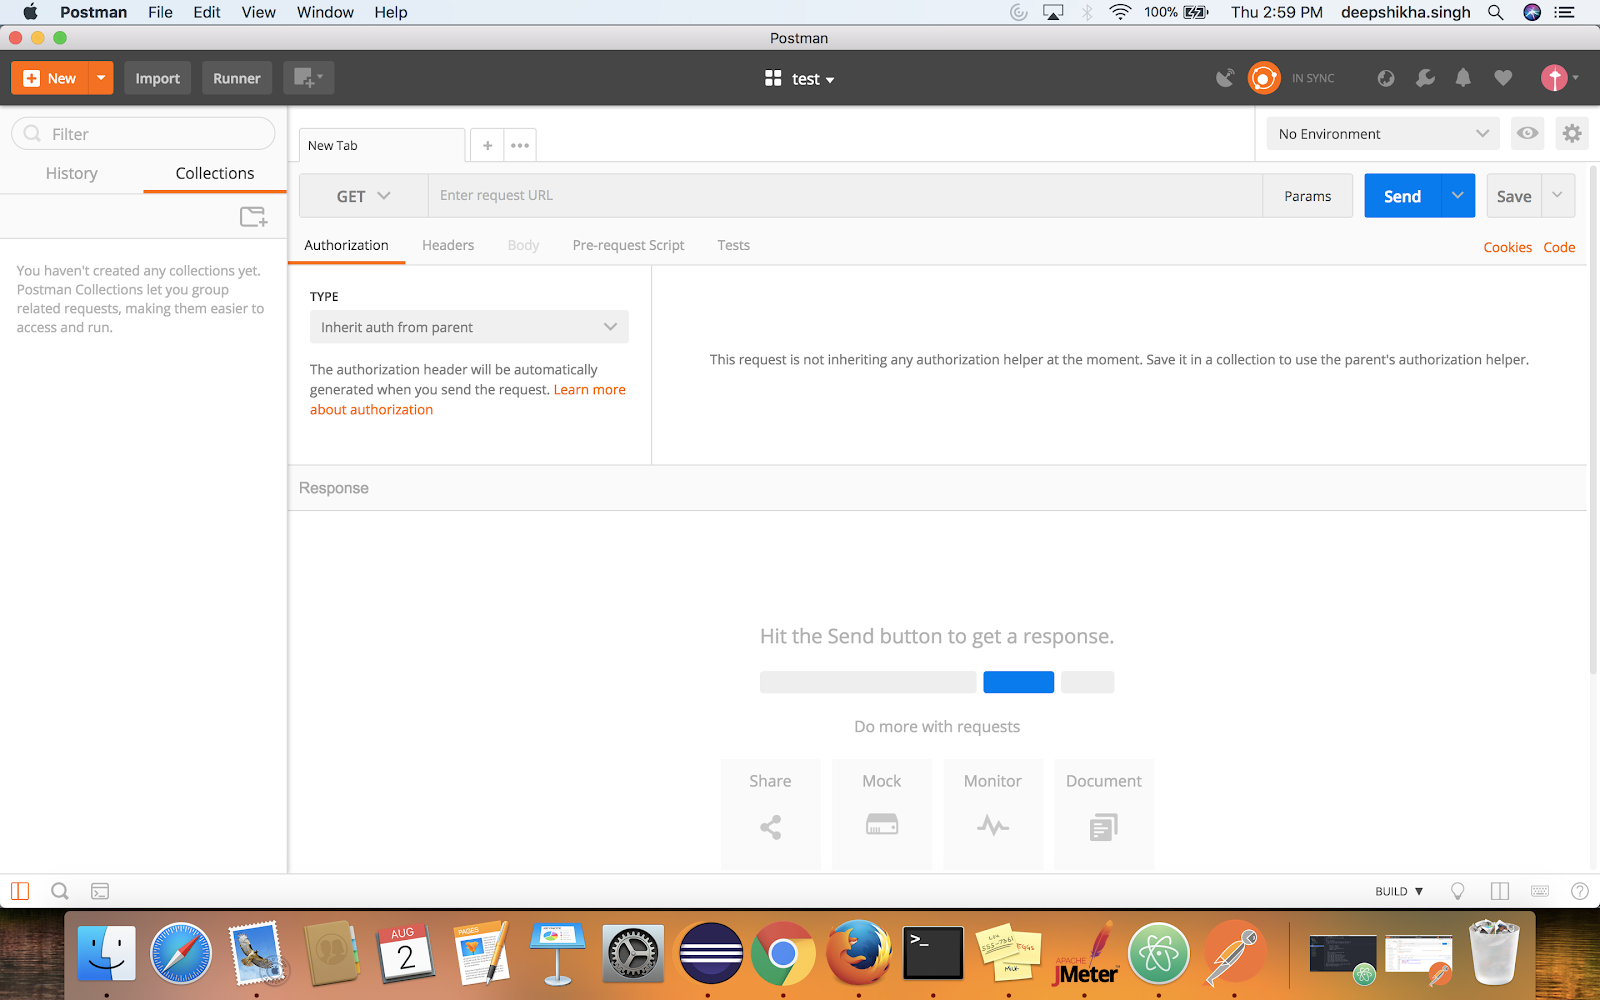
If you have accomplished this step, you are all set to take the next flight.
1.3. Making the first HTTP request in Postman:
Since we have installed the Postman app successfully, it is now time to start testing the API with Postman by making the first-ever HTTP request to the server.
2. Getting Started with Postman
2.1. What is HTTP?
The Hypertext Transfer Protocol (HTTP) is designed to enable communications between clients and servers. HTTP works as a request-response protocol between a client and a server. A web browser may be the client, and an application on a computer that hosts a website may be the server.
Example: A client (browser) submits an HTTP request to the server; then the server returns a response to the client. The response contains status information about the request and may also contain the requested content.
2.2. Most common HTTP methods:
1. GET: The GET method is used to retrieve information from the given server using a given URI. Requests using GET should only retrieve data and should have no other effect on the data.
2. POST: A POST request is used to send data to the server, for example, customer information, file upload, etc. using HTML forms.
3. PUT: PUT is used to send data to a server to create/update a resource. Replaces all the current representations of the target resource with the uploaded content.
4. PATCH: PATCH is used to update partial resources. For instance, when you only need to update one field of the resource, PUTting a complete resource representation might be cumbersome and utilizes more bandwidth.
5. HEAD: HEAD is almost identical to GET but without the response body. HEAD transfers the status line and the header section only.
6. DELETE: The DELETE method deletes the specified resource.
7. OPTIONS: The OPTIONS method describes the communication options for the target resource.
2.3. Testing GET Requests
Let’s now jump directly to test those APIs. Suppose we have an API that fetches the user information of a particular application. To test this we will have to use GET request. The GET request is explained below:
For sample requests, visit https://reqres.in/
2.3.1. For making the first HTTP request(GET):
- Make a collection in Postman — To make a collection in Postman, click on New->Collection->CollectionDemo(Any Collection Name you wish)->Create
- Make a Request — To make a request, click on New->Request->GetUser(Any request name you wish)->Select the Collection you wish to save the request in(Present in the bottom of the dialog box)->Save to Collection Demo
- By now, we have created our first request, now we need to pass different parameters in the request to get the expected response.
- In the “Enter Request URL” text box type: https://reqres.in/api/users?page=1
- Click on the “Send” Button

6. You should be able to see the below response in the Body section:
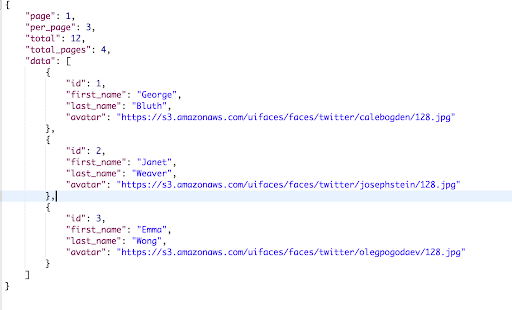
7. You should be delighted you have successfully tested your first API request.
2.4. Testing POST Requests
Now, suppose we need to create a user into an application which means we are sending data or feeding data to an application. For these types of requests, we use POST requests. In a POST request, we send data/parameters in the body of the request, and in response to that, API returns some data to us which validates the user has been created. The response can either be a success message or the id of the new user created and the time when the user was created.
2.4.1. For making the first HTTP request(POST):
POST Request — To make a POST request, click on New->Request->CreateUser(Any request name you wish)->Select the Collection you wish to save the request in(Present at the bottom of the dialog box)->Save to Collection Demo
- From the Dropdown select POST
- In the “Enter Request URL” text box, type: https://reqres.in/api/users
- Click on Body Tab and select the “Raw” radio button
- In the text box, paste :
{
"name": "morpheus",
"job": "leader"
}
"name": "morpheus",
"job": "leader"
}
5. Click on Send button
6. User should see the below response:

7. Also, check for the correct status code, in this case, you should get: ‘Status:201 Created’
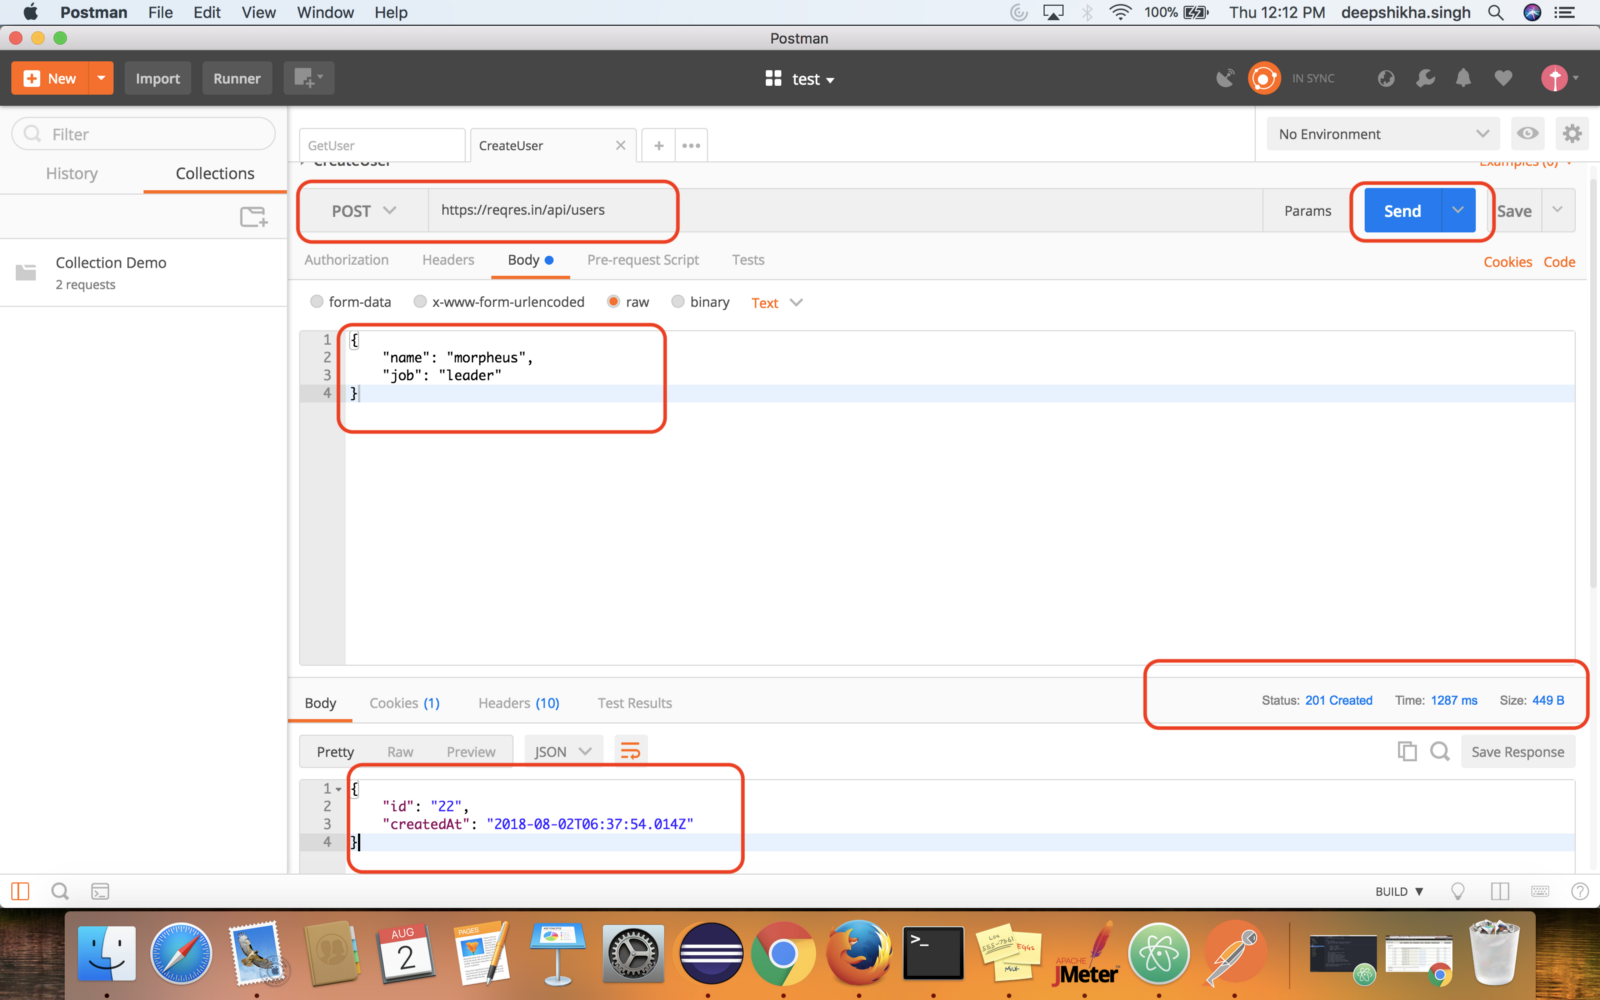
You have successfully tested your POST request too, similarly, you can try your hands with PUT, PATCH, DELETE, etc.
- Check for the expected response.
- Check for the correct status code.
- Check for Time (Response Time), it should be acceptable as per business.
- Always perform negative tests to verify that the API doesn’t respond if data is tampered with.
Automation has now become a norm across sectors, and when used in testing, it can undoubtedly improve the depth and scope of the tests. Since it is not possible to test everything manually, so using Postman automation can save us time as well as effort.
Postman is the ultimate tool for API automation. In this blog, we will be taking a look at how to achieve API automation using Postman.
3. REST API Automation Testing using Postman
Let’s say, a login API generates a Token (OAuth, JWT, etc) and refreshes it every hour. The API utilizes this token to get the expected response. If we don’t automate, we will have to copy and paste this every time for each API.
And for a test suite containing 100 APIs, a good amount of manual effort will go into pasting the token for each API. By introducing automation, this process of updating the newly generated taken can be automated.
3.1. Automate the Login API through Postman
- Open Postman Application and create a collection.
- Then make a POST request to Login API by passing the correct credentials (Body Parameter+Header)


3. Now click on Send button to see the response.

4. In the above response, we get an “access_token” key which would be used in all the following APIs. Hence, we need to write a custom code that can define the variable, and update its value with every hit to the Login API. Going further, we will use this variable for the access_token value and would not need to copy and paste the access_token value for each API.
5. Also, we can create the variable for host_name, protocol, etc so that we don’t need to write the protocol and host_name for each API, instead we can use the variable.
6. Another important aspect is to check for the correct Response/Status Code and the Response Time for each API. It would be really great if we can write the code for this task too, so that when we run our entire API test suite. We can easily view all the failing tests which do not give the correct status code as well as all those APIs which are taking more than an acceptable response time to execute.
7. Below is the sample code snippet which would solve all the above problems.
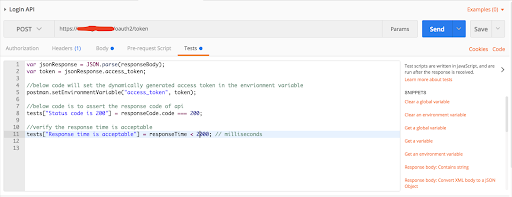
8. You can see the value of access_token is set in the environment variable as expected.
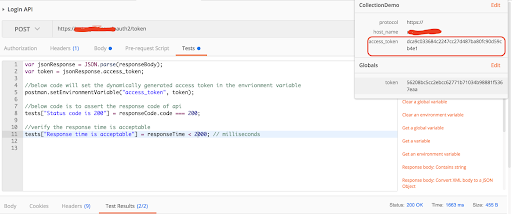
9. Also, under the TestResults tab you can check if the assertions you wrote have been passed or failed.

10. Postman itself provides us with lots of code snippets, you just need to click on the desired code snippet and the generated code adds in the Tests tab to perform assertions/actions. To get the snippets, click on the Tests tab and then on the arrow “<” to see the snippets.
11. If you want to add more custom code, you can always do so depending on your requirements, a couple of them are mentioned in the screenshots below:


That’s all for this blog. Happy Testing!
Next >> SOAP API Testing with SOAPUI
Guest Author
Deepshikha Singh
Automation Expert
📘Tutorials | 🧠AI | 🧪Selenium | 🥇Top 10 | 🛠️Tools | 📋Software Testing


.png)


